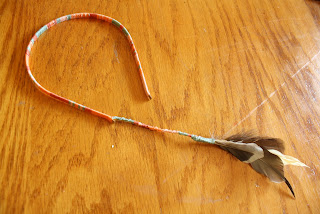
So this idea was born from a combination of inspirations. A few months ago my friend Nikki sent me this tutorial from Honestly...WTF. It's beautiful and you should definitely check it out. Ive been seeing more and more tribal inspired prints and fashion and I am loving the muted and toned in color combos. Check out this Etsy shop. I also recently misplaced my favorite glitter headband and have been searching high and low for something just as fabulous... to no avail. So I decide to made my own. And to top it all off I decided to include a built in feather extension. So without farther ado, I present this very special How To!
YOU'LL BE NEEDING:
1. Scissors
2. A plain headband (metal is best but plastic is ok too) mine is about 1/4 inch wide
3. An embroidery needle
4. Assorted feathers of your choice (Michaels sells really neat feather bouquets which give you a great selection for a couple bucks)
5. A selection of colors of embroidery floss (I used four colors but one more or less would also be okay)
6. A little bit of patience and determination. Ready? Onward!
DO IT:
Take all but one of your embroidery floss colors (heretofore referred to simply as "string") and gather the ends, leave them attached to their spools.
Pinch these ends against the INSIDE SURFACE end of your headband so that the ends of the string line up with the end of the headband as shown
Now begin the wrap this thread around the headband so that the loose end of the string you are working, along with and all the other ends, get wrapped up inside the coil. If you hold onto the headband as shown in the picture, you won't have to worry about the other strings too much.
Keep wrapping for at least an inch until all the ends are securely attached to the headband. It will look like this from the outside.
Now for the fun part. To switch colors bring the string you are working with around the back side of the headband and over all the other strings. Hold it with your finger as you grasp one of the other colors from behind it and begin to wrap the new color in the same direction. The first color is now tucked inside the coil with the other strings.
Now continue this process all the way around the headband, changing colors periodically to create whatever pattern you desire. I changed my patter up regularly to give it a sort of random look but you can get creative here. Make it your own! Be careful to keep an eye on the strings to make sure they don't get tangled. Just take one moment at each color change to arrange them and this shouldn't be too difficult.
Keep going...
When you arrive at the other end of the headband it's time to cut the strings. At this point you need to think about how long you want your feather extension to be. This will depend on the length or your hair and the look you desire. Remember, it will hang down from the back of your ear so this is where you should measure from. Multiply this length times 3 or 4 and cut the strings to this length.
Now tie the last color you were working with to one of the other strings. Make sure the knot is on the inside surface of the headband. Two square knots are all you need.
Now take something heavy (I used a water bottle) and use it to hold your headband to the table. You are going to make a short friendship-bracelet-type-thing with the length of string you have left. The stitch will create a spiral ridge as you work. If you don't know how to do this stitch, refer to the pictures below or to the tutorial linked in the introduction. I changed color periodically to match the pattern I had created on the headband.
Repeat again and again and you'll get this:
Once you are happy with the length its time to gather up your feathers
Tie a long (about 24") piece of string around them about 3/4 inch from the feather ends with plenty of length on both ends of the strings (heretofore referred to as the "feather strings")
Now wrap towards the ends of the feathers, making sure to catch the other side of the string as you go
When you get to the end, tie both ends together
DEEP BREATH (you're almost done!) Attach the feather to the end of the headband by tying one of the feather strings to two of the headband strings and the other feather string to the remaining headband strings. (I know, the picture should help)
As a finishing touch, I used one of the feather strings and did some friendship bracelet stitches down the shaft of the feathers and over the rest of the strings. After a few stitches I trimmed all of these strings and continued to do friendship stitches until the ends were covered up.
Finally, take your embroidery needle and thread the last string through it. Using the needle, thread the final string under the remaining coils on the feather shaft to secure the end.
I know this tutorial has A LOT of steps but I hope you give it a try. I'd love to see what you create. If you love the idea but don't want to make your own, place a custom order at my Etsy Shop and I'll make one for you! Good luck and happy spring.


It's so beautiful, thank you for sharing how you made it. I think I may have to give this a try.
ReplyDeletethis is amazing :)
ReplyDeleteI love the idea!!
http://bubblemylicorice.blogspot.com/