Hello Bloggy world.
I just received an email from my lovely sister, Emily with an introduction to her new blog, The Other Day. I felt inspired after reading her first post and I ended up looking back on what I started here and I'm actually pretty proud of the few posts I made before I changed plans (for the thousandth time). While I still consider myself on the road to becoming a professional maker, It's taken on a very different form for the next few years. I've gone back to school, starting back at square one to pursue another bachelor's degree in mechanical engineering in hopes of eventually beginning a career or seeking further education in product design. As you might imagine this has required a great deal of time and energy and It's been a huge and difficult, albeit gratifying, challenge for me, to say the least. I've spent the past year or so breathing, eating, and drinking MATH MATH MATH and more math, with a little chemistry and physics thrown in for good measure. If you'd asked me 5 years ago it that was even a possibility, I would have laughed in your face but the experience has been broadening and it's nice to have a direction that feels feasible.
If I have any fans out there, you might have noticed that I've let my Etsy shop go dormant for the time being. It takes a surprising amount of time and self promotion to make sales on Etsy and I simply couldn't continue to do it while back in school. I am however, facing a summer long break in which none of my engineering classes are offered so ill be working, climbing and sewing my way though the next three hot desert months. I am really excited about the prospect of working on some projects I've been dreaming about (in some cases, literally. I had a dream last night about a magical polkadot dress, but more on that later.) I have also want to continue my series on great thrift and vintage shopping in Tucson. Maybe we can even take a trip together to the wonder that is the San Diego Salvation Army. Elana has been visiting just about every weekend since our wildly successful shopping spree about a month or so ago while I was up there for the weekend.
Anyway look forward to some new material in the coming months and let me know if there's anything you'd like to see. Thanks for reading friends!
Always,
Eliza
elizzaruth
This is where I chronicle my journey to becoming a "professional" maker. I am seizing a big and scary opportunity to share what I do with the world. Hopefully you will learn some new skills, find inspiration, share ideas and get to know me a little bit better.
Sunday, April 21, 2013
Tuesday, May 8, 2012
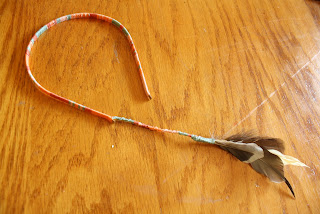
How To: Wrapped Headband with Feather Extension
So this idea was born from a combination of inspirations. A few months ago my friend Nikki sent me this tutorial from Honestly...WTF. It's beautiful and you should definitely check it out. Ive been seeing more and more tribal inspired prints and fashion and I am loving the muted and toned in color combos. Check out this Etsy shop. I also recently misplaced my favorite glitter headband and have been searching high and low for something just as fabulous... to no avail. So I decide to made my own. And to top it all off I decided to include a built in feather extension. So without farther ado, I present this very special How To!
YOU'LL BE NEEDING:
1. Scissors
2. A plain headband (metal is best but plastic is ok too) mine is about 1/4 inch wide
3. An embroidery needle
4. Assorted feathers of your choice (Michaels sells really neat feather bouquets which give you a great selection for a couple bucks)
5. A selection of colors of embroidery floss (I used four colors but one more or less would also be okay)
6. A little bit of patience and determination. Ready? Onward!
DO IT:
Take all but one of your embroidery floss colors (heretofore referred to simply as "string") and gather the ends, leave them attached to their spools.
Pinch these ends against the INSIDE SURFACE end of your headband so that the ends of the string line up with the end of the headband as shown
Now begin the wrap this thread around the headband so that the loose end of the string you are working, along with and all the other ends, get wrapped up inside the coil. If you hold onto the headband as shown in the picture, you won't have to worry about the other strings too much.
Keep wrapping for at least an inch until all the ends are securely attached to the headband. It will look like this from the outside.
Now for the fun part. To switch colors bring the string you are working with around the back side of the headband and over all the other strings. Hold it with your finger as you grasp one of the other colors from behind it and begin to wrap the new color in the same direction. The first color is now tucked inside the coil with the other strings.
Now continue this process all the way around the headband, changing colors periodically to create whatever pattern you desire. I changed my patter up regularly to give it a sort of random look but you can get creative here. Make it your own! Be careful to keep an eye on the strings to make sure they don't get tangled. Just take one moment at each color change to arrange them and this shouldn't be too difficult.
Keep going...
When you arrive at the other end of the headband it's time to cut the strings. At this point you need to think about how long you want your feather extension to be. This will depend on the length or your hair and the look you desire. Remember, it will hang down from the back of your ear so this is where you should measure from. Multiply this length times 3 or 4 and cut the strings to this length.
Now tie the last color you were working with to one of the other strings. Make sure the knot is on the inside surface of the headband. Two square knots are all you need.
Now take something heavy (I used a water bottle) and use it to hold your headband to the table. You are going to make a short friendship-bracelet-type-thing with the length of string you have left. The stitch will create a spiral ridge as you work. If you don't know how to do this stitch, refer to the pictures below or to the tutorial linked in the introduction. I changed color periodically to match the pattern I had created on the headband.
Repeat again and again and you'll get this:
Once you are happy with the length its time to gather up your feathers
Tie a long (about 24") piece of string around them about 3/4 inch from the feather ends with plenty of length on both ends of the strings (heretofore referred to as the "feather strings")
Now wrap towards the ends of the feathers, making sure to catch the other side of the string as you go
When you get to the end, tie both ends together
DEEP BREATH (you're almost done!) Attach the feather to the end of the headband by tying one of the feather strings to two of the headband strings and the other feather string to the remaining headband strings. (I know, the picture should help)
As a finishing touch, I used one of the feather strings and did some friendship bracelet stitches down the shaft of the feathers and over the rest of the strings. After a few stitches I trimmed all of these strings and continued to do friendship stitches until the ends were covered up.
Finally, take your embroidery needle and thread the last string through it. Using the needle, thread the final string under the remaining coils on the feather shaft to secure the end.
I know this tutorial has A LOT of steps but I hope you give it a try. I'd love to see what you create. If you love the idea but don't want to make your own, place a custom order at my Etsy Shop and I'll make one for you! Good luck and happy spring.
Tuesday, February 21, 2012
Etsy Stuff
I just ordered a bundle of prints of this to promote my Etsy shop around town! I'm teaching myself to use Photoshop, and while it may not be the best program for the job It's the only one I've got. I think i'm slowly getting better. What do you think?
Monday, February 20, 2012
How To: Simple Chair Re-Upholstery
So I know it's been awhile since my last how to post. I've been working hard to get my etsy shop up and running. I made my first Etsy sale last week and while it's good news, I still have a lot of work to do. I have been meaning to do this project for awhile so I figured I share the process, and the results with you. If you decide to try this out be prepared to use a bit of imagination and problem solving, since every piece of furniture is different and some may be more difficult then others. This will at least give you a starting point for a very simple technique to bring new life to an old chair.
I found the chair I'm working on here at the Saint Vincent de Paul Thrift store for $10.00. I thought the design and color went perfect with my newly purchased mid-century dresser from the Broyhill Brasilia collection.
YOU'LL BE NEEDING:
1. Pliers
2. Screw driver (preferably with interchangeable heads to help you tackle any type of screw)
3. Rotary cutter or Scissors
4. A staple gun with 1/4" staples.
5. Upholstery Fabric of your choice (I got about two yards of this from goodwill for about $2.00 in the textiles section)
6. Lining fabric (any cheap cotton weave will do, I used and old bed sheet)
6. A chair that needs some love
DO IT:
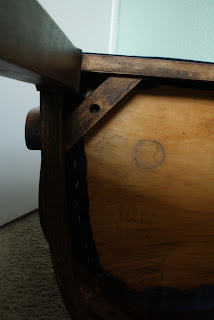
Inspect the underside of your chair to determine how the seat is attached. Mine is simply screwed on with four screws, one in each corner.
Inspect the screws to determine what type of tools you'll need to remove them. Mine were little squares. I'm quite sure that's the technical name for them.
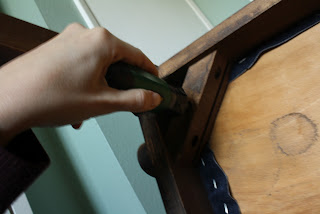
Remove the seat from the rest of the chair using your tool of choice.
Now you're ready to remove the Upholstery. In my case it was simply attached with staples. I used a Flathead screwdriver and some elbow grease to remove it.
To my surprise there was yet another layer of upholstery fabric under the first so I removed that as well using the same technique.
I discovered some mold in the foam cushion. Rather then throw it out and buy new foam, which I would suggest if you're not on as tight a budget as I am, I washed it in hot water with a quarter cup of bleach to kill any and all nastiness that might have been living in there and I threw out the old fabric. Here's the before and after:
Now Lay the seat on your lining fabric and cut around it with about 3 inches of allowance.
Use this as a template to create another identical shape from the upholstery fabric.
Now begin to wrap the seat in the lining fabric. You don't need many staples for the lining fabric as you are only going to tack it down. work from the center top and bottom, then the center sides. Always place a staple directly across from the staple you've just done to ensure the fabric is evenly stretched on all sides. Neatly fold and tack down the corners.
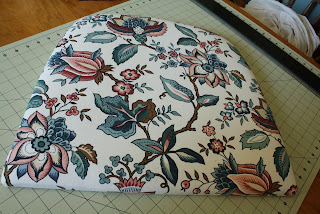
Now repeat the process using the upholstery fabric. Place the staples no farther then 2 inches apart, working the same way as above. take care at the corners that the top and sides are as seamless as possible.
Now your seat should look something Like this:
Now replace the seat on the chair and re-attach using the original hardware and you're done! My old chair now reflects my personal style, goes great in my bedroom and is an awesome complement to my new dresser. Let me know how your projects go and good luck!
Subscribe to:
Posts (Atom)


